Feature
Add a background and frame to your screen recordings
Updated
In short
To add a background to a screen recording, you shrink the screen slightly, place it on a background (photo, gradient, solid color or your own image) and give it a frame: padding, rounded corners, a shadow. Clarcut does it in a few clicks, can add a mock macOS, browser or Windows window, and saves the whole look as a preset for your next videos. It's included in the free version.
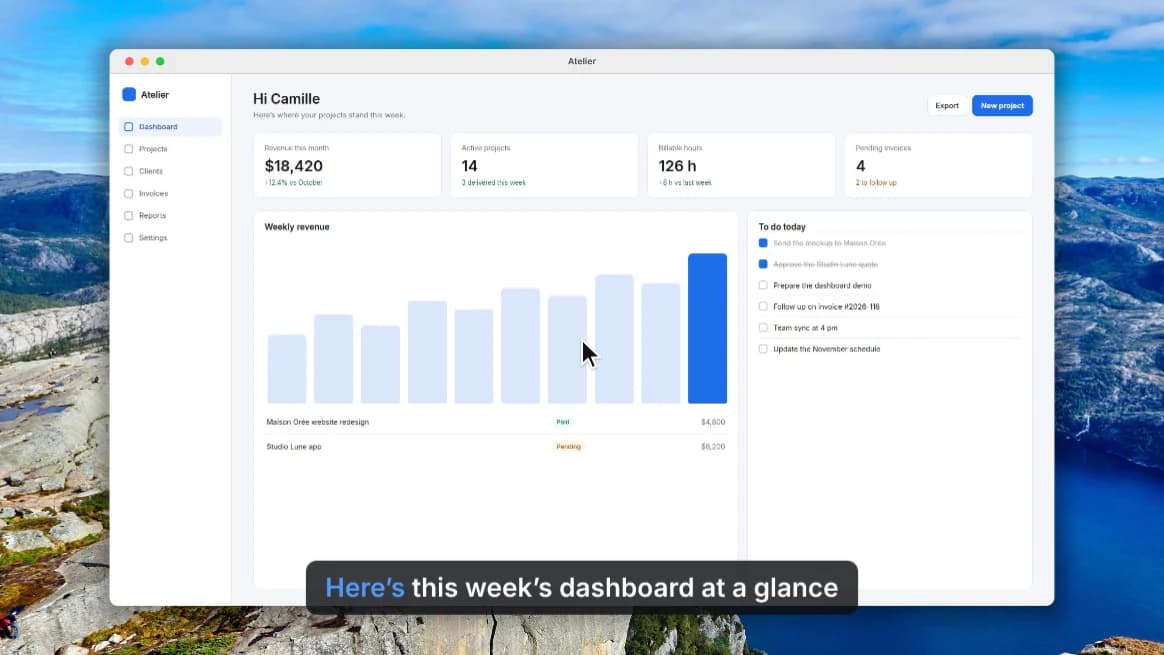
Why style a screen recording
A raw screen recording is a rectangle jammed against the edges of the video, complete with the taskbar, the clock and sometimes a messy desktop. It looks like a quick capture. The same content on a background with some padding and rounded corners looks like a product video.
Styling has practical benefits too: the padding gives zooms room to breathe, the background lets you adapt the video to vertical and square formats without black bars, and a consistent style makes your videos instantly recognizable.
Every background and frame setting
| Setting | Options | Tip |
|---|---|---|
| Background | Built-in photos (fjord, northern lights, mountain peaks…), gradients, solid color, imported image | A calm background makes the interface pop; save busy photos for short videos. |
| Padding | Space between the screen and the edge of the video | Small padding for videos watched on phones, more for a showcase look. |
| Rounded corners | Corner radius of the screen | A slight curve is enough to soften the image. |
| Shadow | Drop shadow under the screen | Separates the screen from the background, especially on light backgrounds. |
| Inner border | Thin outline around the screen | Useful when the interface and background colors are similar. |
| Mock window | macOS, browser or Windows style, dark theme, window title | Adds context: “we're in the browser,” “we're in the app.” |
| Hide title bar | Hides the real title bar of the recorded window | Avoids doubling up with the mock window and overly long titles. |
| Logo | Your logo overlaid on the video | Small, in a corner, to brand your videos. |
| Style presets | Background, frame, logo and more, saved together | One preset per use: customer demo, social, docs. |
How to style your video, step by step
- 1
Record a window instead of the full screen
You skip the taskbar and desktop, and the frame wraps the app exactly.
- 2
Pick a background
A photo, a gradient, a solid color in your brand colors, or your own image.
- 3
Set padding, corners and shadow
Check the preview in your final format: padding that looks small in 16:9 can look huge in vertical.
- 4
Add a mock window if you want
macOS, browser or Windows, light or dark, with any title. Hide the real title bar so it doesn't show up twice.
- 5
Add your logo
Put it in a corner that won't get in the way of zooms.
- 6
Save it all as a preset
Your next video gets the same look in one click.
Which look for which use
| Use | Background | Frame | Mock window |
|---|---|---|---|
| Product demo for your website | Gradient or calm photo | Medium padding, shadow, rounded corners | Browser, with your domain as the title |
| Tutorial or documentation | Neutral solid color | Small padding, light shadow | Optional |
| Vertical video for social | Bold color or photo | Small padding to keep the screen readable | Rarely useful |
| Internal training | Company colors | Medium padding, logo | Match the OS your team uses |
| Reply to a customer | Your usual preset | From the preset | From the preset |
Build a brand look with three presets
If you publish regularly, set up a few presets once instead of tweaking every video. Three cover most needs.
- A “showcase” preset for your website and launches: brand-color background, medium padding, shadow, a browser mock window with your domain, a subtle logo.
- A “social” preset for vertical and square: bold color, small padding, larger cursor, no mock window.
- A “help” preset for docs and support: neutral solid color, small padding, nothing decorative to pull focus.
Give them clear names. If coworkers record too, agree on the same settings: your videos will look consistent no matter who's behind the mic.
Mistakes to avoid
- Too much padding: the screen gets tiny and text becomes unreadable on phones.
- A background that steals the show: a high-contrast photo pulls attention away from the interface.
- Colors that blend together: a dark interface on a dark background with no shadow or border just disappears.
- A different look every time: a preset saves time and gives your channel or help center an identity.
- A mismatched mock window: a macOS frame around a Windows app can confuse your Windows users.
Other ways to add a background
In a standard editor (Clipchamp, iMovie, DaVinci Resolve, Premiere Pro), you can get something similar: put a background image on one track, your recording on another, scale it down, then add a shadow and a rounded-corner mask depending on what the editor offers. It works, but you redo it for every video, and zooms get tricky with the frame.
On Mac, Screen Studio offers the same kind of automatic styling. For a still screenshot rather than a video, screenshot beautifier tools do the job.
Clarcut isn't built for advanced motion graphics (animated titles, fancy transitions, lots of tracks). For those projects, a full editor is still the better choice.
Frequently asked questions
How do I put a background behind a screen recording?
In Clarcut, open the background settings and pick a photo, a gradient, a solid color or your own image. The screen is automatically scaled down and placed on it, with the padding you choose.
Can I use my own background image?
Yes, you can import an image as your background. Pick something calm and large enough for the resolution you plan to export.
How do I round the corners of a screen recording?
Clarcut has a rounded corners setting in the frame options, along with padding, shadow and an inner border. In a standard editor, you have to apply a mask by hand.
Can I hide the title bar of the recorded window?
Yes, Clarcut can hide the recorded window's title bar, and replace it with a mock window (macOS, browser or Windows) with any title you like.
Can I reuse the same style across videos?
Yes, save a style preset: background, frame, logo and other settings are applied together to your next videos.
Are backgrounds and frames free?
Yes, all styling is included in the free version, which exports at 1080p and 30 fps with a small watermark. Clarcut Pro removes it for a one-time $44.